


You can set up dynamic DNS on the Seagate Business Rackmount and grant it access through FTP.
The first step is to create a Dyn account. To do so, visit the www.dyn.com website.
After the account is created, follow these steps:
1 - From the administrator page of the Seagate Business Rackmount, go to Network under Settings. Select the Remote Access tab and select DynDns in the dropdown menu.
2 - Enter your DynDns information into the fields to tie your account to the Rackmount.
3 - Make sure the FTP service is started to allow FTP connections to the Rackmount. To turn the service on, go to General under Settings. Once in there, click on the Services tab and enable the FTP service by clicking on the Edit button, which you can find by mousing over to the right side of the screen.
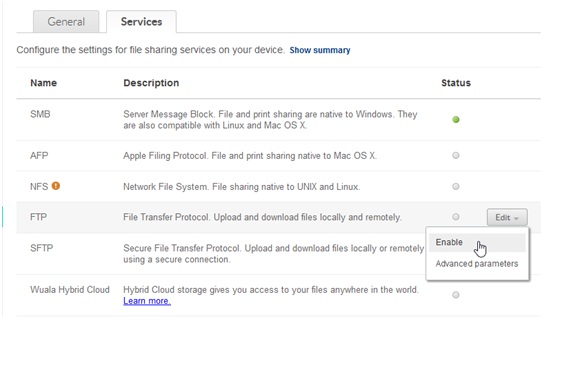
4 - The FTP protocol should also be enabled on the shares you want to access via FTP. To ensure the service is on, go to Shares, under Users and Shares. Access the Edit drop-down by mousing over the right side of the screen. Choose Access Protocols in the menu.
5 - The FTP service should be green (active) as long as the service has been turned on globally.
6 - Now that your Dyn account has been tied to your Rackmount, and the FTP service has been turned on for both the Rackmount globally and the shares you want to access through FTP, you should be able to access the device with an FTP connection.
Note: Remote access through FTP requires the use of a 3rd party FTP client. Seagate does not support those clients directly.